

"Fall of the Corrupted Eunuch" is the second and final stage in Part 3 of Wo Long: Fallen Dynasty. Players will make their way through the dungeons below Luoyang, fighting through a wide variety of Wo Long: Fallen Dynasty's enemy soldiers. The mission will culminate with the battle against the quest's namesake corrupted eunuch, Zhang Rang. This powerful member of the imperial court will create several clones that the player must neutralize before facing the sorcerer himself.
"Fall of the Corrupted Eunuch" features thirteen flags overall, with seven Battle Flags, and six Marking Flags. Completing all thirteen flags will allow the player to reach level 20 fortitude, ensuring that they will not fall below that number upon death.
All Battle Flags In "Fall of the Corrupted Eunuch"

Unfortunately, Wo Long: Fallen Dynasty does not feature a detailed level map, so each flag location will be described as accurately as possible. Always keep an eye out for the tell-tale pillar of light that emits from each flag stand, this will act as a beacon for players struggling to locate well-hidden flags.
Battle Flag 1:

As with every stage, the first Battle Flag is located at or near the starting point. Here, players will cross the first pit of pink muck, jump up the rock steps, and find themselves standing at the first flag.
Battle Flag 2:


The second Battle Flag is at ground level, down among the pink liquid that causes spirit wither and spirit fervor. It is guarded by a Leader shuigui (mermaid). There are several of the lower-level shuigui swimming around in the muck as well, requiring careful planning before jumping into an attack. Take out the shuigui from above, then slowly approach the Leader from behind. Once it is dead, interact with Battle Flag 2.
Battle Flag 3:

The first step to reaching Battle Flag 3 is recovering the Luoyang Dungeon Keys. The keys are very close to Battle Flag 2, use the above image to locate.


After finding the keys, return to Battle Flag 2 and climb the ladder seen in the first image. At the top of the ladder, there is a locked door cell that contains Battle Flag 3.
Battle Flag 4:

Battle Flag 4 is found after fighting Baishe, one of Wo Long: Fallen Dynasty's formidable mini-bosses. It is along a linear path and essentially impossible to miss.
Battle Flag 5:

Like Battle Flag 4, this Battle Flag is directly on the main path that leads to the estate. Following the path from flag 4, the player will come across several jars of the same pink muck from the dungeon. Watch for two dogs hiding behind them. At the next turn, look up at the tree to find two assassins waiting to spring an ambush. These enemies are extremely deadly, so be careful. Behind the tree is the door to the estate, which flag 5 sits directly behind.
Battle Flag 6:


In the estate's first chamber, there is a central staircase that will lead to the second chamber's entrance. As soon as the player enters the second chamber, turn left to see Battle Flag 6 at the opposite end of the hall. This area is just as heavily guarded as the first, so approach with extreme caution.
Battle Flag 7:

The final Battle Flag is found in the outside area, just before the entrance to Zhang Rang's chamber. It is guarded by a formidable Leader, so it cannot be activated until the area is cleared. This area is full of dangerous enemies, including a changgui, one of Wo Long: Fallen Dynasty's toughest enemies, so move methodically, and plan each takedown with care.
All Marking Flags in "Fall of the Corrupted Eunuch"

Marking Flag 1:

From the first Battle Flag, follow these directions:
- Head left into the chamber where Yuan Shao is standing. Head past him until reaching stairs.
- Turn left down the stairs. There is a single demonized soldier and demon spider. Head down the walkway until reaching the breakable section. The game will try and trick the player with high-value loot, but do not cross.
- Instead, turn left and enter the open cell. Near the back corner, there is an opening the player must drop through.
- After dropping, a hammer-wielding demonized officer will be waiting in the next cell. Deal with it and the soldiers.
- Look up in the back corner of the cell the officer was waiting in to find a hole. This passage leads into the cell with the first marking flag.
Marking Flag 2:


From Marking Flag 1, follow these instructions:
- Head back through the hole in the wall and out onto the wood deck that oversees the entire chamber.
- Looking across the chamber, Marking Flag 2 can be seen. Cross the long, wooden bridge, watching for the demonized soldier that patrols it.
- At the end of the bridge, the player will see into an open cell. There is a sword-wielding demonized officer pacing back and forth. If timed correctly, he can be hit with a fatal strike. However, make sure to look for the bomb-throwing fanatic on the path that leads to the chamber above.
- Once the enemies have been defeated, take the path up. At the top, turn left into the open room. Here, open the locked door for later, then walk towards the opposite wall, turning left when able.
- Head down the path, clearing the fanatic and the large Huoshu (rat).
- Along the walkway, there is a small, wooden extension that sticks out. From here, the second Marking Flag is visible. Simply drop to the lower level and interact.
Luoyang Dungeon Keys Location: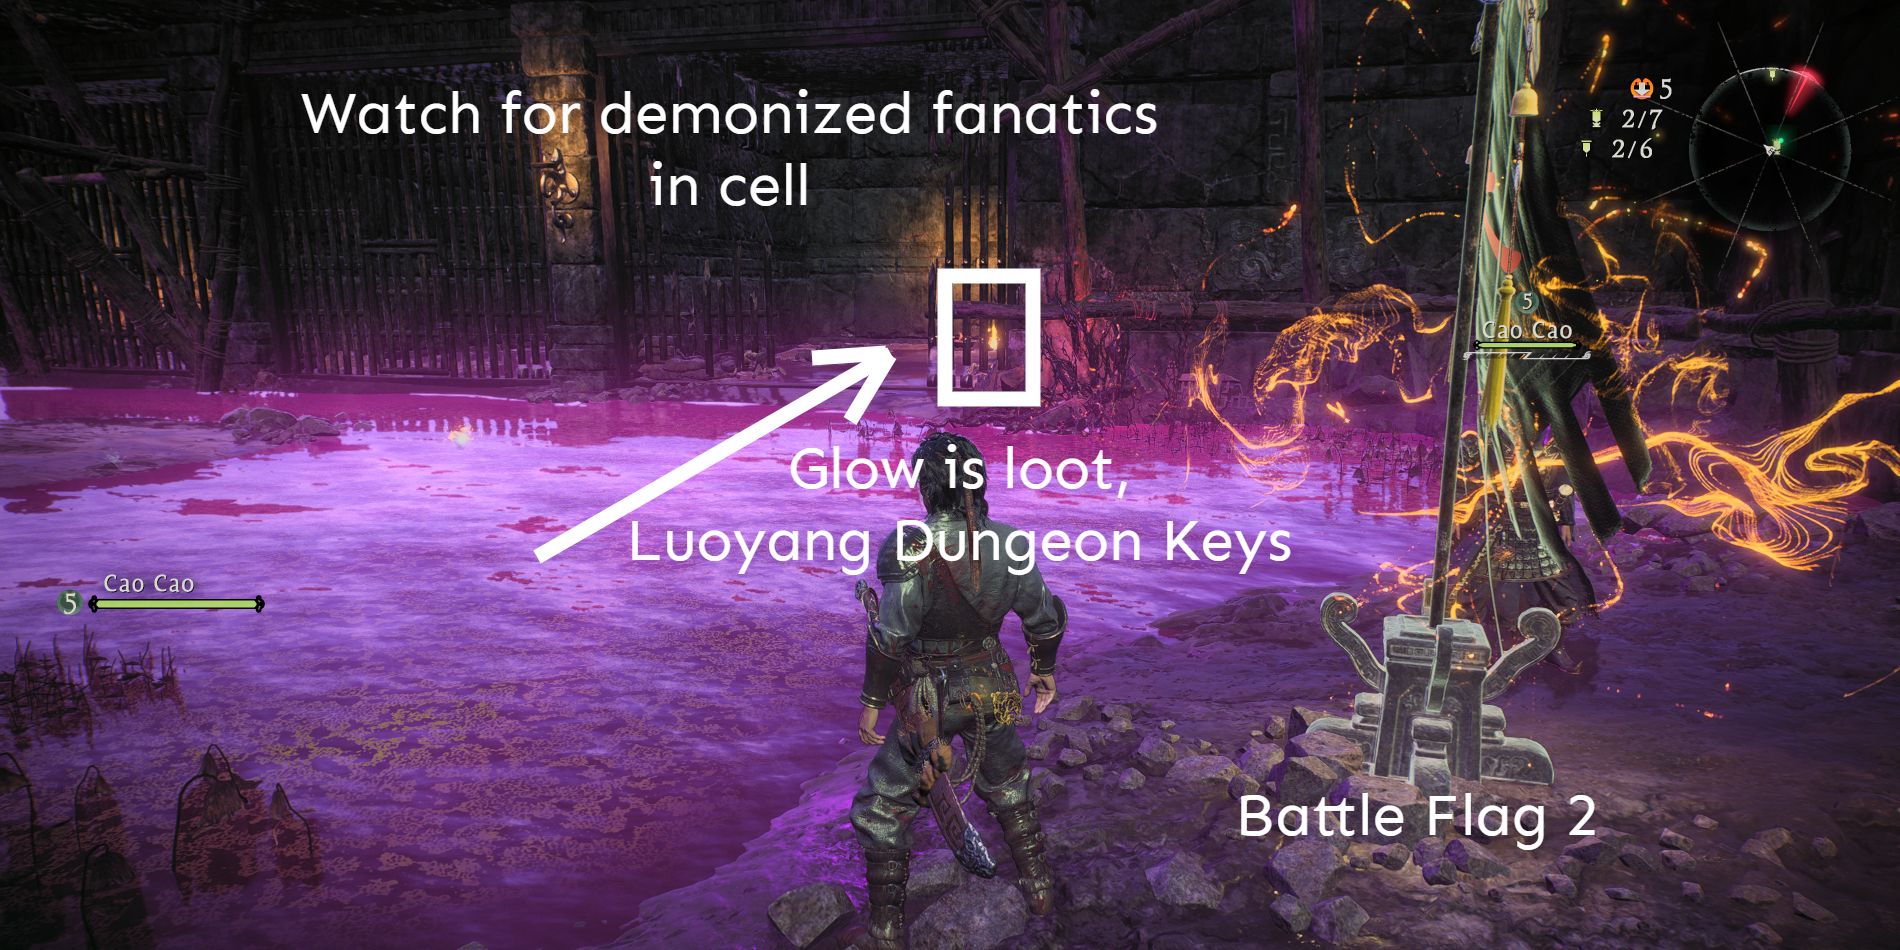
Marking Flag 3:


From Battle Flag 2, follow these instructions:
- The Dungeon Keys are required to reach Marking Flag 3, see above image for instructions on retrieving.
- With the key, head over the large rocky area to the open chamber behind it. Head towards the back wall and make a left when possible.
- Turn left again to see a locked door. Use the keys to open, revealing Marking Flag 3.
Marking Flag 4


From Battle Flag 5, follow these instructions:
- From the flag, head into the next room, which is a large gallery/library. There are several enemies patrolling this area, so it may be wise to clear it first.
- From the room's entrance, a smaller bookshelf is visible on the left. Use this to jump up to the next level.
- Facing the small bookshelf, it will be the left side of the upper level the player should aim for. Take the left corner to find Marking Flag 4.
Marking Flag 5:


From Marking Flag 4, follow these instructions:
- While standing at Marking Flag 4, turn around to see a massive hole in the wall that leads to the roof outside.
- Head outside and follow the roof around, taking a left, until another entrance is found.
- Head inside to find two ladders; one that goes up, and one that must be kicked down. First, kick the ladder down, so it is not forgotten later, then take the ladder up and into the next level.
- Marking Flag 5 will be found in the top room. Watch for the assassin waiting near the flag.
When locating Marking Flag 5, it is likely the player will be invaded. It may happen slightly before or after, but it will happen. If players have Wo Long: Fallen Dynasty's PVP mode turned off, it will be an NPC. It can be annoying, but it must be dealt with before moving on.
Marking Flag 6:


From Battle Flag 6, follow these instructions:
- Looking up from Battle Flag 6, a small entrance can be seen to the left of the second story bookshelf. See the above image for detailed view.
- Head through to the hidden area and follow the path. There are no enemies, and it only leads to one thing: Marking Flag 6.
Wo Long: Fallen Dynasty is available now on PS4, PS5, Xbox Series X/S, Xbox One, and PC. There is a free demo available on all platforms until 03/26/23.